Google URL Inspection Tool: Complete Guide for SEO & Indexing Issues
What Is the Google URL Inspection Tool and Why It Matters
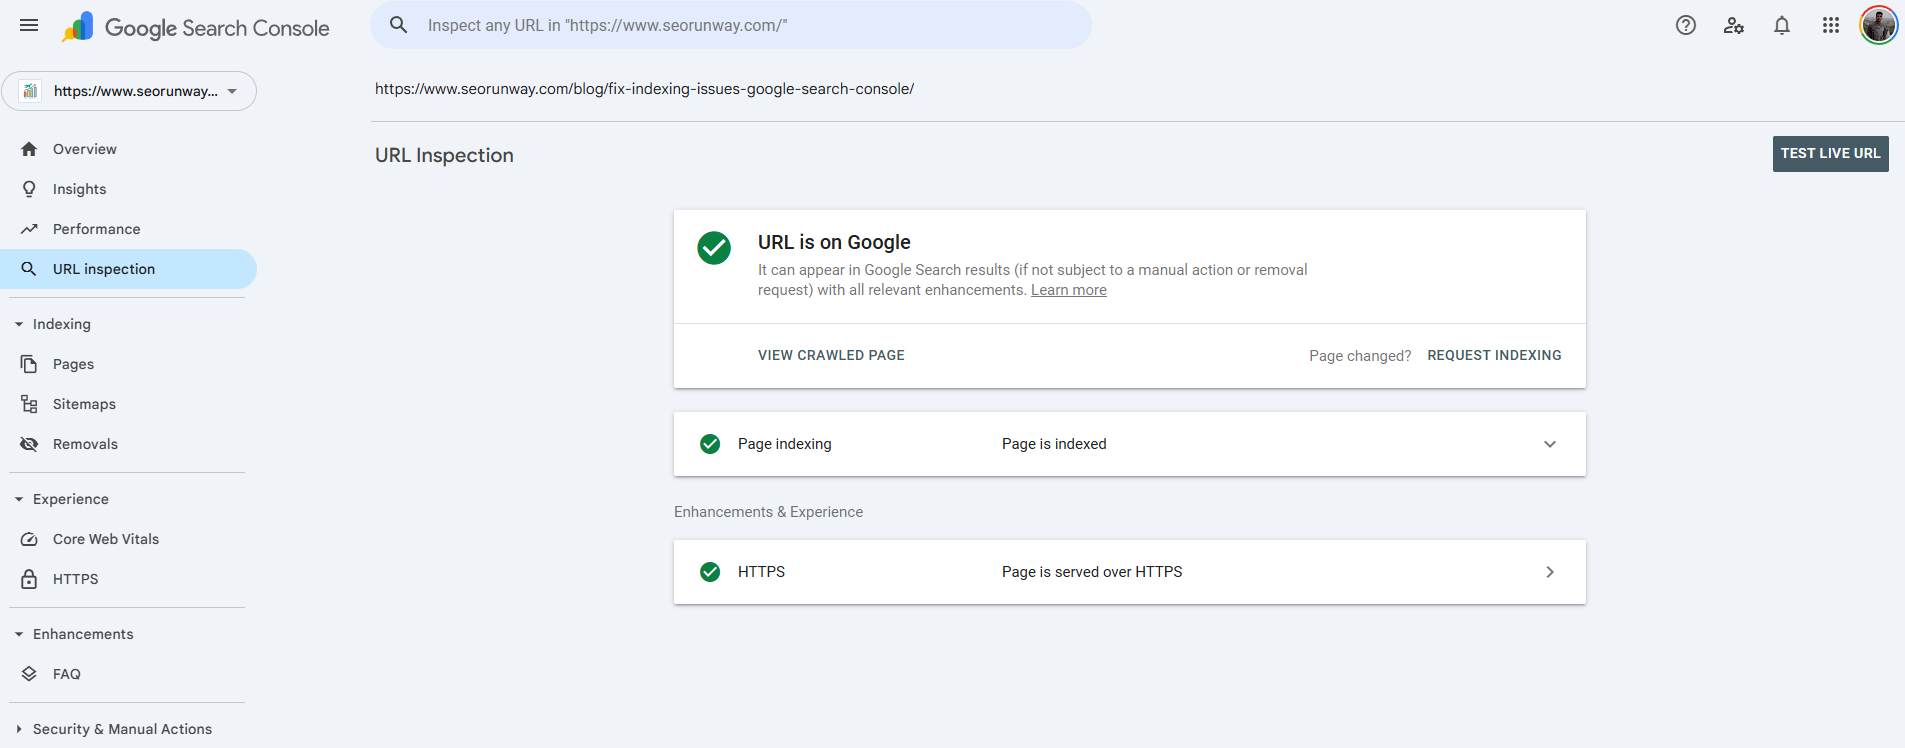
The Google URL Inspection tool is one of the most powerful features inside Google Search Console, yet many site owners underuse it. This tool allows you to inspect a specific URL on your website and understand exactly how Google sees it, whether it is indexed, how it was crawled, which canonical Google selected, and whether there are any technical issues preventing it from appearing in search results.
If you have ever published a new page and wondered why it is not ranking, fixed an SEO issue and wanted to confirm the fix, or suspected indexing problems, the URL Inspection tool is where you should start. Understanding how to use this tool correctly can save you weeks of guesswork and help you diagnose indexing problems with precision.
How to Access and Use the Google URL Inspection Tool
Where to Find the Tool in Google Search Console
- Log in to Google Search Console
- Select the correct property (Domain or URL Prefix)
- At the top of the interface, locate the search bar
- Paste the full URL you want to inspect and press Enter
This launches the GSC URL inspection explained view, where Google shows all available data for that specific URL.
Key Information You See in the URL Inspection Report
Once the report loads, Google provides several critical data points:
1. Indexing Status
This tells you whether the URL is indexed or not. Common messages include:
- URL is on Google
- URL is not on Google
- URL is unknown to Google
This section is the foundation of inspect URL coverage analysis.
2. Last Crawl Date
Shows the last time Googlebot crawled the page. A recent crawl with outdated content often indicates caching or canonical issues.
3. Crawl Errors
If Google encountered problems, you may see errors such as:
- Blocked by robots.txt
- Soft 404
- Redirect error
- Server error (5xx)
These errors directly affect indexability.
4. Canonical URL Inspection (GSC)
Google shows:
- User-declared canonical
- Google-selected canonical
If these do not match, Google may be ignoring your preferred version.
5. Mobile Usability
Confirms whether the page is mobile-friendly, which impacts indexing and rankings.
6. Rendered Page and Resources
The render page tool lets you see:
- How Google renders the page
- Blocked CSS or JavaScript
- Layout issues affecting content visibility
When Should You Use the URL Inspection Tool?
Knowing when to use the tool is just as important as knowing how to use it.
Use It After Publishing New Content
If a newly published page does not appear in search, inspect it to:
- Confirm crawlability
- Request indexing
- Detect noindex tags or canonical conflicts
Use It After Major Content Changes
After updating:
- Page content
- Title tags or headings
- Internal links
- Structured data
Run a new inspection to ensure Google processes the changes correctly.
Use It After Fixing Errors
If you resolved:
- Coverage errors
- Redirect issues
- Duplicate content problems
The tool helps verify that Google recognizes the fix.
Use It to Verify Canonicals and Redirects
For migrations, HTTPS changes, or URL consolidation, canonical URL inspection in GSC confirms whether Google respects your setup.
Requesting Indexing, Live Test, and Crawl Requests
Deep Dive into the Live Test’s Technical Details
The “View Crawled Page” Feature
Within the Live Test of the Google URL Inspection tool, the View Crawled Page feature provides deep, real-time technical insights into how Googlebot accesses and renders a URL. This section is especially valuable for debugging indexing and rendering issues that are not visible from the indexed version alone.
When you open View Crawled Page, Google shows three critical components:
Rendered Page Screenshot
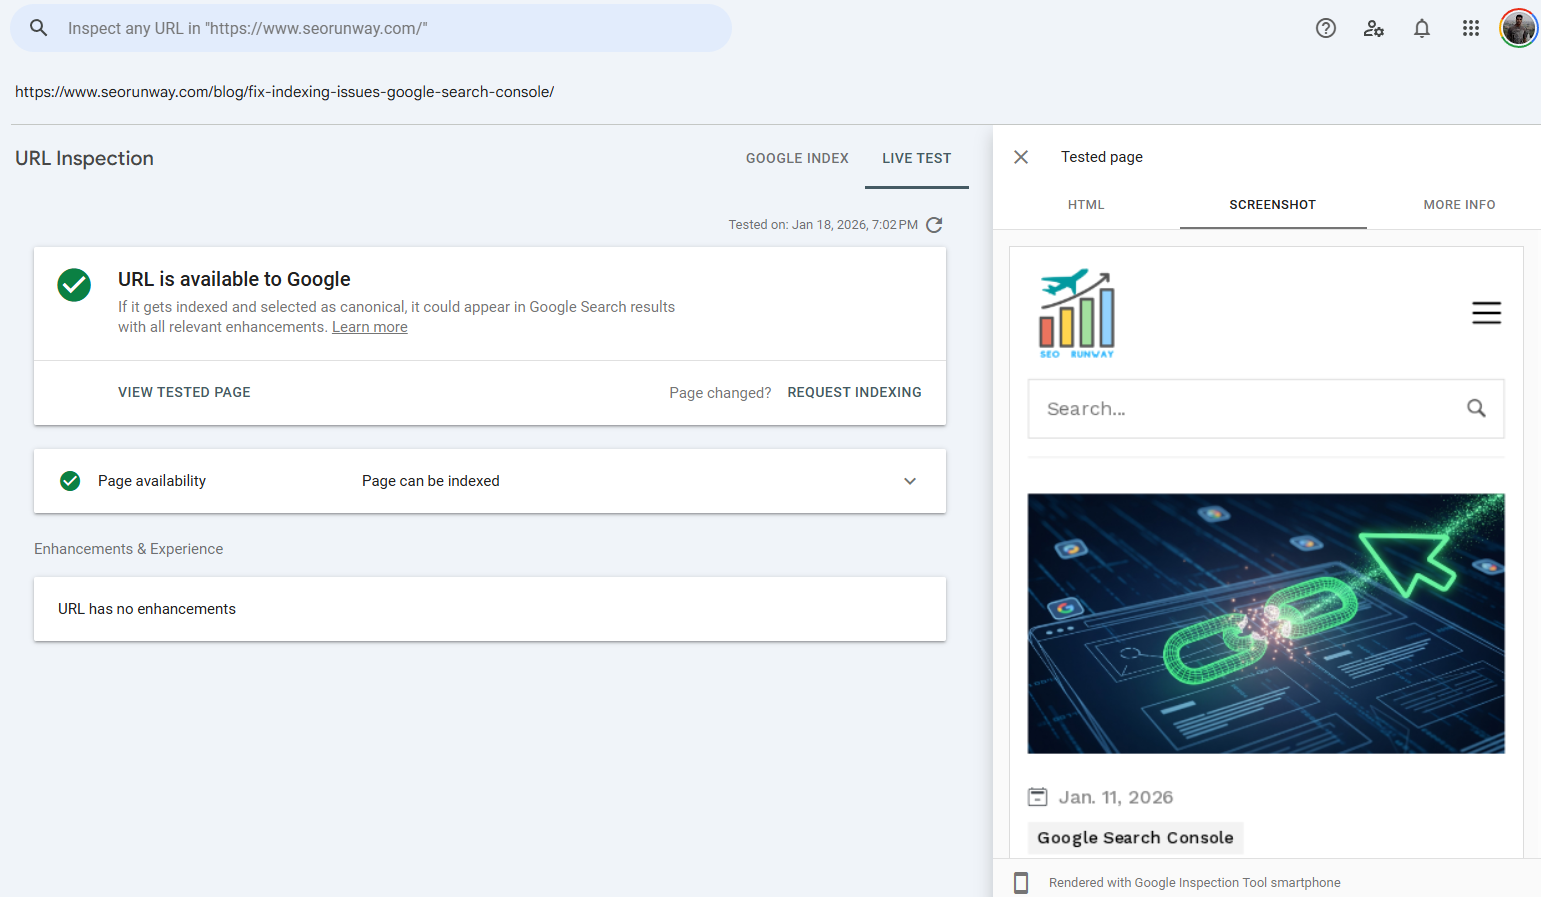
A full visual screenshot of how Googlebot renders the page. This allows you to verify whether key content, navigation elements, and layout components are actually visible to Google. Missing content here often indicates JavaScript rendering problems or blocked resources.
Raw HTML
The exact HTML Googlebot receives after crawling the page. This is essential for checking whether important elements like main content, internal links, meta tags, structured data, or canonical tags are present in the server response and not injected later by client-side scripts.
HTTP Response Headers
The server response headers returned during the crawl, including the HTTP status code. This helps confirm whether the page returns the correct status (such as 200 OK) and allows you to detect issues like unintended redirects, 4xx errors, 5xx server errors, or caching and header misconfigurations.
Together, these views make the Live Test one of the most powerful tools in Search Console for diagnosing:
- JavaScript rendering issues
- Blocked CSS or JavaScript resources
- Incorrect server status codes
- Discrepancies between what users see and what Googlebot sees
Using View Crawled Page during the Live Test ensures you are debugging issues based on Google’s real-time crawl perspective, not assumptions or cached data.
Live Test vs Indexed Test Explained
Live Test
- Checks the current live version of the page
- Shows real-time crawlability and renderability
- Useful immediately after changes
Indexed Test
- Shows the version Google has stored
- May lag behind recent updates
This live test vs indexed test comparison helps determine whether Google has processed your latest changes.
How to Request Indexing in Google Search Console
If the live test shows the page is eligible for indexing:
- Click Request Indexing
- Google queues the URL for crawling
- Indexing may take minutes to several days
The request indexing feature is especially useful after publishing or fixing issues, but it should not be abused.
Interpreting URL Inspection Results: Common Statuses Explained
Here are the most common URL inspection statuses and what they mean:
URL Is Indexed
Good news. The page is eligible to appear in search results.
Crawled – Currently Not Indexed
Google crawled the page but chose not to index it yet. Possible reasons include:
- Thin or duplicate content
- Low internal linking
- Quality or relevance issues
Discovered – Currently Not Indexed
Google knows about the URL but has not crawled it yet. Often caused by:
- Crawl budget limits
- Low priority signals
- Poor internal linking
Handling “Blocked by robots.txt” with the Live Test
Google cannot crawl the page due to robots.txt rules.
When a URL shows a “Blocked by robots.txt” status in Google Search Console, the Live Test within the URL Inspection tool becomes the most reliable way to diagnose the issue. The Live Test effectively acts as a robots.txt tester for that specific URL, using Googlebot’s actual crawl rules rather than assumptions or third-party tools.
How the Live Test Diagnoses robots.txt Blocking
When you run a Live Test on a blocked URL, Google Search Console:
- Attempts to crawl the page in real time using Googlebot
- Evaluates the site’s current robots.txt file
- Determines whether the URL is allowed or disallowed under active rules
If the URL is blocked, the Live Test will explicitly report that crawling is prevented by robots.txt and identify the specific rule responsible for the block.
This is a critical diagnostic feature because it shows:
- The exact
Disallowdirective affecting the URL - Which user-agent rule Googlebot is matching
- Whether the block applies to the entire directory or a specific path pattern
Why This Is More Accurate Than Manual robots.txt Checks
Manually reviewing robots.txt files can be misleading, especially when:
- Multiple user-agent rules exist
- Wildcards or pattern matching are used
- Old assumptions are made about which Googlebot is crawling the page
The Live Test removes ambiguity by showing how Googlebot itself interprets the file at crawl time.
Actionable Steps After Identifying the Blocking Rule
- Update the robots.txt file to remove or adjust the disallow rule
- Ensure the URL returns a crawlable 200 status
- Re-run the Live Test to confirm the block is resolved
- Use Request Indexing if the page is important and eligible
Why This Matters for Indexing
If Google cannot crawl a page due to robots.txt restrictions
- The content cannot be evaluated
- Updates will not be processed
- The page may remain excluded from search results
Using the Live Test as a robots.txt diagnostic tool ensures you are fixing the exact cause of the block, not guessing, and allows you to validate the fix immediately from Google’s perspective.
Duplicate Without User-Selected Canonical
Google found duplicate pages and selected a different canonical than the one you specified.
Understanding these excluded URLs GSC meanings is critical for resolving indexation problems.
Actionable Steps for Canonical Mismatch
In the Canonical URL Inspection section of the URL Inspection report, Google displays two values:
- User-declared canonical: The canonical URL you specified using a <link rel="canonical"> tag
- Google-selected canonical: The URL Google has chosen as the primary version for indexing
When these two do not match, Google is signaling that it does not fully trust your canonical signal. Understanding why this happens is critical to resolving duplication and indexing issues.
Common Reasons for a Canonical Mismatch
1. Conflicting Internal Links
If a large number of internal links point to a non-canonical version (for example, parameterized URLs, HTTP vs HTTPS, or trailing-slash variations), Google may treat that version as more authoritative.
Actionable fix:
- Update internal links to consistently point to the user-declared canonical URL
- Avoid linking to alternate or duplicate URL versions in navigation, breadcrumbs, and XML sitemaps
2. Conflicting External Links (Backlinks)
If external websites link primarily to a different URL version than the one you declared as canonical, Google may select the linked-to version instead.
Actionable fix:
- Strengthen internal linking to the preferred canonical URL
- Ensure the canonical URL is included in your XML sitemap
- Use redirects where appropriate to consolidate link equity
3. Accidental Noindex on the Canonical Page
If the user-declared canonical page contains a noindex directive (meta tag or HTTP header), Google will ignore it as a canonical candidate and select another URL instead.
Actionable fix:
- Remove any
noindexdirectives from the canonical URL - Confirm the page returns a 200 status code
- Re-run the Live Test and request re-indexing after fixing the issue
Additional Checks to Perform
To fully resolve canonical mismatches, also verify:
- The canonical URL is crawlable and not blocked by robots.txt
- Only one canonical tag exists per page
- Canonical URLs are absolute (not relative)
- Redirect chains do not conflict with canonical declarations
Why Fixing Canonical Mismatches Matters
Canonical inconsistencies can cause:
- Indexing of the wrong URL version
- Diluted ranking signals
- Crawl inefficiencies
- Unstable search performance
Resolving these issues ensures Google consistently indexes and ranks the correct version of your pages.
This section pairs well with the Live Test and View Crawled Page features, allowing you to confirm canonical fixes from Googlebot’s perspective before requesting indexing.
Pro Tips for Using the Google URL Inspection Tool Effectively
Use It Before Promoting Content
Before running ads, outreach, or social campaigns, confirm the page:
- Is indexed
- Has the correct canonical
- Renders properly for Googlebot
Use It After Major SEO Changes
After site migrations, CMS updates, or design changes, spot-check important URLs to catch issues early.
Combine It with Coverage and Performance Reports
URL Inspection is diagnostic. Use it alongside:
- Coverage reports for scale
- Performance reports for ranking and traffic insights
Do Not Overuse Request Indexing
Google places strict rate limits on the “Request Indexing” feature in Search Console to prevent abuse and unnecessary crawling. In practice, the limit is 10 manual indexing requests per day. Once this quota is reached, you must wait before submitting additional URLs.
If you exceed the limit, Search Console may:
- Temporarily disable the Request Indexing option
- Display a message indicating you have reached your daily quota
- Require you to wait (typically up to 24 hours) before submitting new requests
These limits apply at the account or property level, not per individual URL.
Because of this restriction, the request indexing feature should be used strategically, not as a routine publishing step. Google’s systems are designed to discover and crawl URLs automatically through:
- Internal linking
- XML sitemaps
- Normal crawl behavior
Best Practices
Use Request Indexing only for high-value situations, such as:
- Newly published cornerstone or revenue-driving pages
- Important content updates that need to be reprocessed quickly
- Pages that were previously blocked or returning errors
- URLs affected by canonical, redirect, or noindex fixes
For large batches of URLs, submitting an updated XML sitemap is the correct and scalable approach.
Final Thoughts: Why Every SEO Should Master the URL Inspection Tool
The Google URL Inspection tool gives you direct insight into how Google crawls, indexes, and evaluates individual pages. It removes guesswork from technical SEO and allows you to validate fixes, diagnose indexing problems, and ensure your most important content is eligible to rank.
Whether you are troubleshooting a single page or validating major site changes, mastering this tool is essential for modern SEO success.